Vivo Y53 being budget-friendly smartphone comes loaded with 5 Inch Display with a good resolution. One might like to take screenshot or capture screen on Vivo Y53. Moreover 1.4Ghz quad core processor makes it much easier for us to cara screenshot Vivo Y53. Vivo Screenshot guide has never been much simpler than described in this tutorial.
To Capture Screenshot in Vivo Y53, we have three different methods. And also, Screenshots can be categorized into two different categories as well. So we will be going through each and every method to take Screenshot on Vivo Y53.
Must Read: 5 best Android Apps to backup Android Data without Root
Contents
How To Take Normal Screenshot in Vivo Y53 [Quick]
As Vivo Y53 offers good screen ratio therefore one can expect the clarity of Screenshot to be super awesome. In this Normal Screenshot mode, one will be able to take screenshot of the Current Screen being seen on your Vivo Y53. Or in simple words, just take screenshot of the visible screen on Vivo Y53.
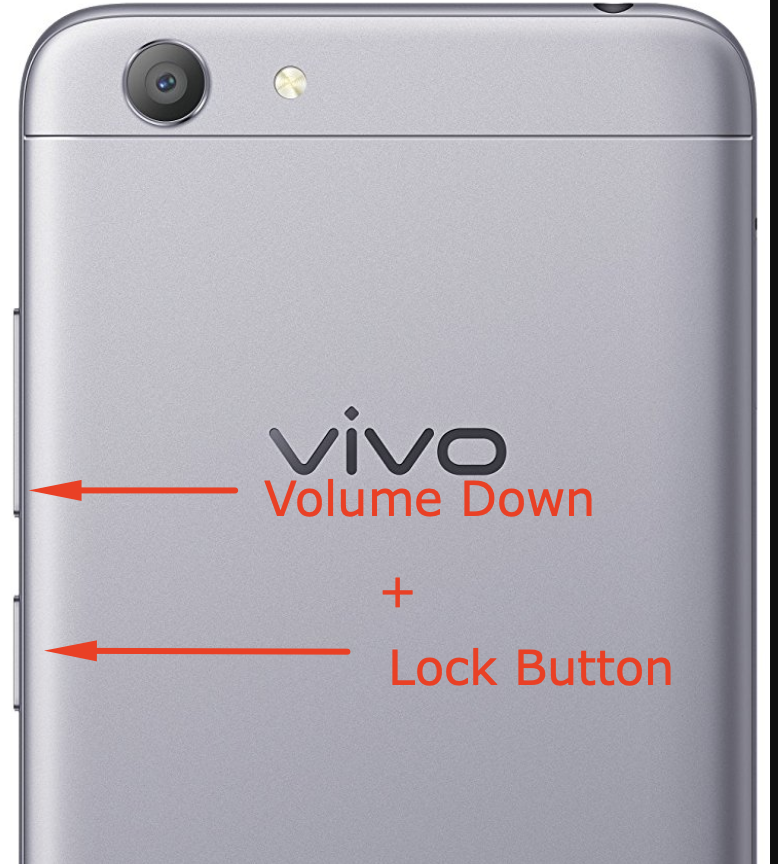
Hardware Key Combination to Take Screenshot in Vivo Y53
- Step 1: Head over to the screen which you want to take screenshot on Vivo Y53.
- Step 2: Now gently press Power/Lock Key along with Volume Down key simultaneously until you hear a pop or click sound with flash on your screen.
Vivo Y53 Screenshot ShortCut - Step 3: You will see a notification that the Screen has been captured successfully on Vivo Y53. Scroll down the notification bar for the same.
- Step 4: You can now go to the gallery or Photos App of Vivo Y53 and go to the screenshot you just captured which will be directly available or you can browse the same in “Screenshots” folder of Vivo Y53 and can share or edit the same.
How to take Screenshot in Vivo Y53 using Screenshot Toggle
Screenshot toggle or Screenshot direct capture icon on Vivo Y53 is another very handy way by which you will be able to Capture Screen in Vivo Y53 directly via Notification panel of the phone.
- Navigate to the Screen which you want to take screenshot on Vivo Y53.
- Scroll Down the notification bar and search for Screenshot Icon or S-Capture Icon. Click on it.
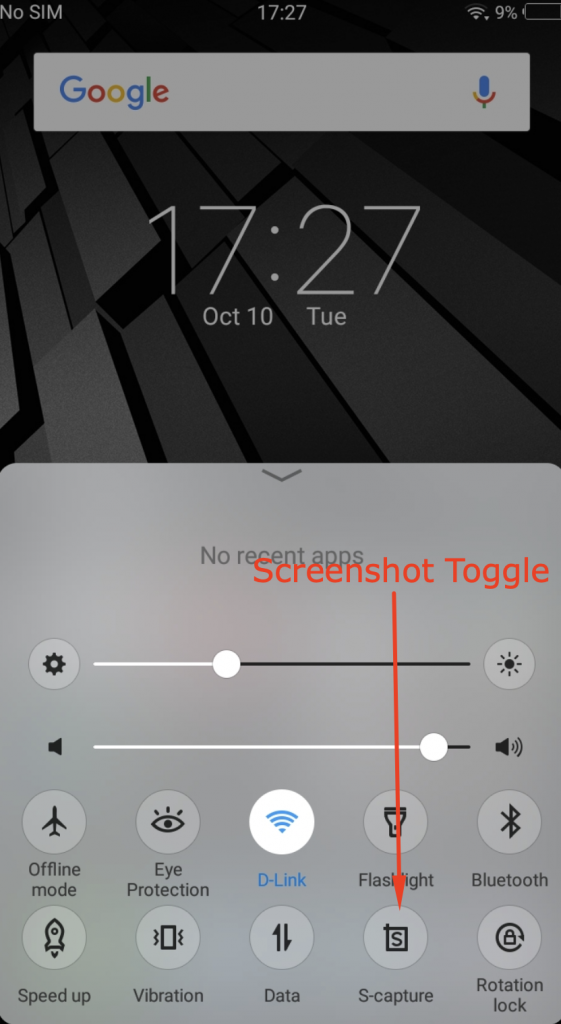
Screenshot from Notification Toggle Vivo Y53 - You have successfully captured screenshot on Vivo Y53. Head over to Gallery of your phone or directly access the recent taken Screenshot from Notification bar itself.
Note: If you do not see Screenshot Toggle or Screenshot Icon in the Notification bar area. Then, you need to first enable this toggle from Quick Access settings icons in the Notification bar, then first edit the Active List of Toggles and add Screenshot Toggle to Active toggle list and save it.
Capture Screenshot in Vivo Y53 using Voice Command
This is one of the cool way to take screenshot on your device as it makes you stand out of the crowd in the manner you Capture screen by simply ordering your phone. Make sure that you have “Enabled” Google Voice Assistant on Vivo Y53.
- Step 1: Go to the screen which you want to take screenshot on your device.
- Step 2: Now Speak “OK Google” on Vivo Y53 and Say “Take Screenshot”
- Step 3: Let the phone do its work as you are the master. The Screenshot has been taken successfully on Vivo Y53.
- Step 4: Go to the Gallery > Screenshots Folder and you will find the latest screenshot you just took on your device. It is now ready to share and edit as well.
How To Take Long Or Scrolling Screenshots on Vivo Y53
Scrollable Screenshot or Long Screenshot is another way of capturing huge screen with page breaks into single photo. To be more clear it can help you capture whole website which is scrollable in one screenshot and save it for your convenience with good quality without any scattering of pixels.
Note: Your phone to take long screenshot you need to atleast run Android Nougat 7.0 or above.
Capture Long Screenshot on Vivo Y53
- Go to the page which you are taking as scrollable or Long Screenshot in Vivo Y53.
- Hold down Volume UP and Power/Lock Key simultaneously for 2 seconds.
- You will now Capture the current screen and will also see Option to “Scroll Down”, Click on the same and Browse down until you want to stop capturing Long Screenshot on your phone.
- Head over to the gallery to see the screenshot you just took and can share the same.
If you are stuck anywhere or failed to take screenshot in Vivo Y53, then do let us know in the comments section below.