Xiaomi MI MIX 3 Screenshot guide will dive you through various methods to Capture Screenshot in Mi Mix 3 that include Hardware Keys, Software Key toggles and Gestures. Xiaomi Mi Mix 3 was launched with amazing specs and the way the sliding function comes into play makes me go crazy with the looks of this phones by Xiaomi. Mi Mix 3 is beautifully carved smartphone power packed with Qualcomm Snapdragon 845 processor which in fact will allow you to make use of this stunning 6.39-inch AMOLED screen to take screenshot easily on Xiami Mi Mix 3.

Guide to Take Screenshot In Mi MIX 3The objective of How to Take Screenshot On Xiaomi MI Mix 3 can be achieved in various manners with two types of screenshots which involves very easy mechanism – Some Hardware based and some software based.
Contents
How to Take Quick Screenshot on Xiaomi MI Mix 3
Normal Screenshot is the simple screen capture of Xiaomi MI Mix 3 which you are currently on. It does not have the option to take two pages screenshot in one go. Now to Capture screenshot on Xiaomi MI Mix 3 normally, we have various methods. Choose the one that suits you better and fastest.
Also Read: Best Music Downloader Apps for Android
Hardware Key Combination to Take Screenshot on Xiaomi MI Mix 3
This is one of the oldest methods which is still being continued on all of the Android phones that comes with Hardware keys like Volume rockers and Power or Lock Button.
- Go to the screen which you want to take a screenshot on Xiaomi MI Mix 3.
- Press Down Volume Down and Lock/Power key simultaneously until you see your screen flashing or click sound is heard if you are in Sound Mode on Xiaomi MI Mix 3.
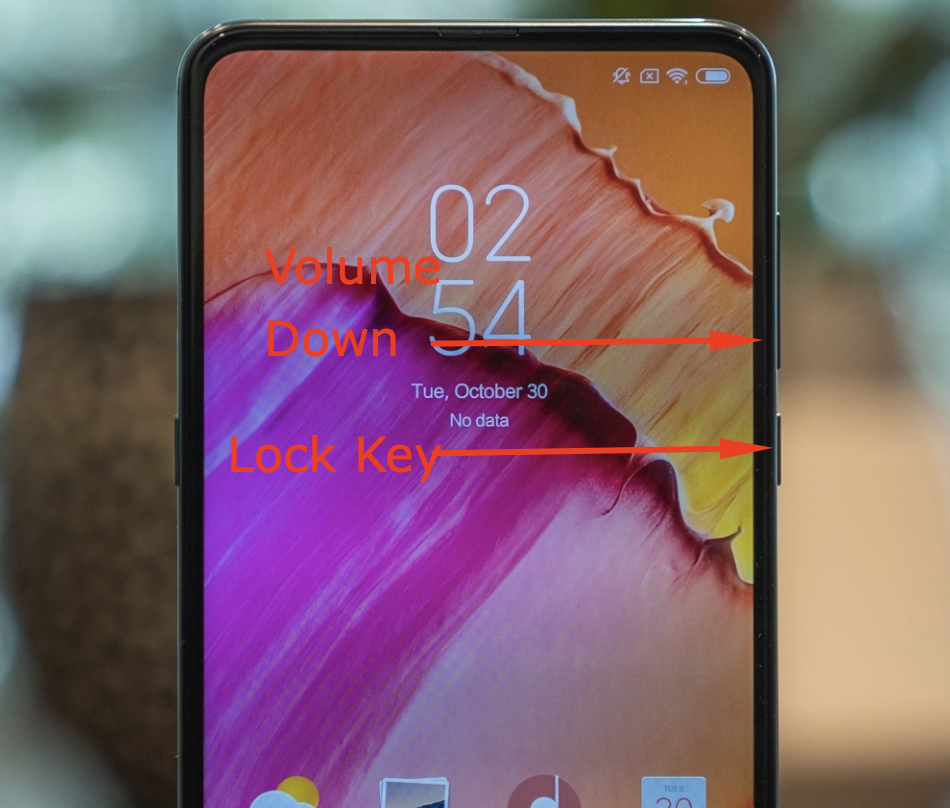
Hardware key combination Mi MIX 3 - You will now see a notification that “Screenshot Saved” in your Notification Bar Area. If you do not find the same, then manually head over to the Gallery App and look for the recent picture of Screenshot taken in Xiaomi MI Mix 3
- Share or Edit the screenshot directly from the notification bar once you have taken screenshot in your phone.
Take Screenshot On Xiaomi MI Mix 3 with Gestures
One can also take screenshot on Xiaomi MI Mix 3 by simply using your fingers or gestures. One might be amused as to how to take screenshot on Xiaomi MI Mix 3 using Gestures. Well the method is so simple:
- Navigate to the screen which you want to take screenshot in Xiaomi MI Mix 3
- Now Simply use your “Three Fingers” and slide it over the screen.
- You will now hear click sound or screen flashing which shows that you have now taken screenshot in Mi Mix 3 using 3 finger scroll gesture.
- Head over to the gallery app on Mi Mix 3 and find the latest screenshot taken which you can edit and share later on.
How to Enable 3 Fingers Slide Screenshot on Xiaomi Mi Mix 3
Note: By default this feature of 3 finger scroll screenshot is disabled on Mi Mix 3, You need to enable 3 finger Screenshot on Mix 3 by following this quick guide:
- Step 1: Go to Settings on your phone and Head as follows: Settings > Additional Settings > Button and Gesture Shortcuts.
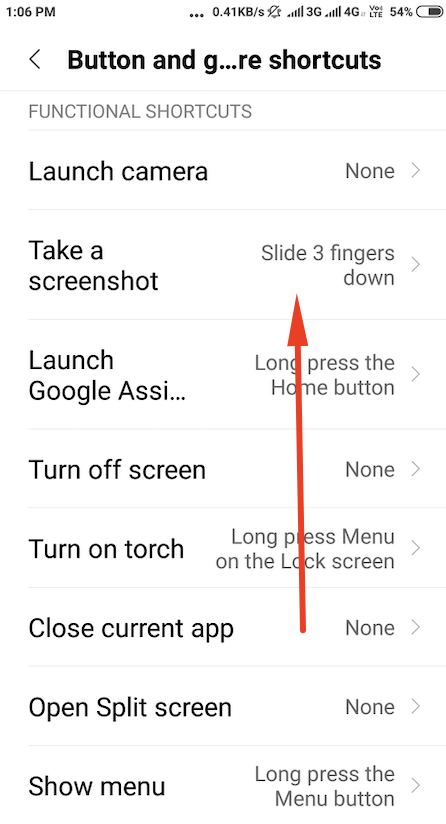
3 Finger Slide to Take Screenshot Xiaomi Mi Mix 3 - Step 2: Now Select “Take A Screenshot” option and Enable “Slide 3 Fingers Down” from the list.
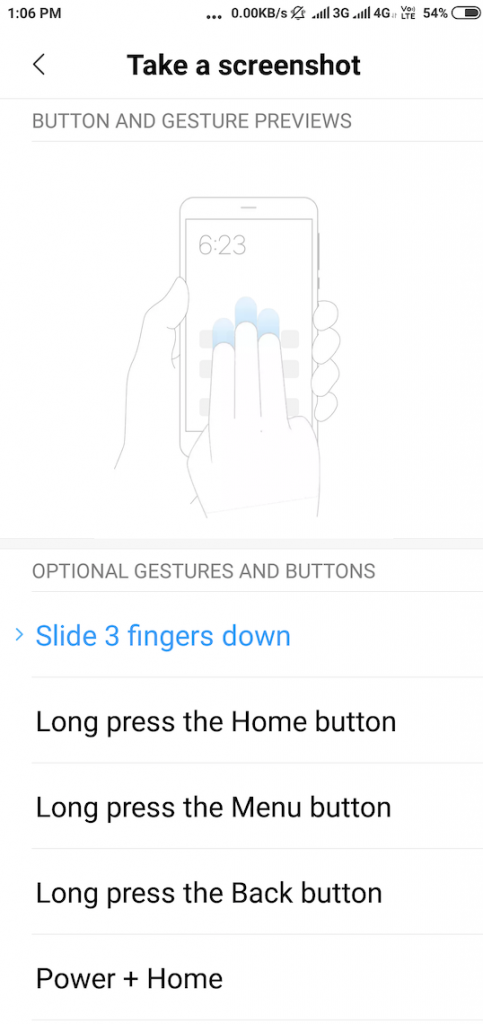
Enable 3 Finger Slide Screenshot Xiaomi Mi Mix 3
You have now successfully activated the Slide 3 fingers Down to take Screenshot in Mi Mix 3.
Bonus: You can also create custom key combination to take screenshot on Xiaomi Devices, by selecting from the options which you saw above like:
- Long Press the Home Button
- Long Press the Menu Button
- Power + Home or
- Power + Menu etc..
Software Method: Take Screenshot In Xiaomi MI Mix 3 using Notification Toggle
This is one of the simplest method to capture screenshot on Xiaomi MI Mix 3. The procedure goes as follows:
- Navigate to the screen you want to take Screenshot on Xiaomi MI Mix 3.
- Drag Down the Notification bar and search for the Screenshot Icon on your phone.
- Click on Screenshot Notification Toggle in Xiaomi MI Mix 3.
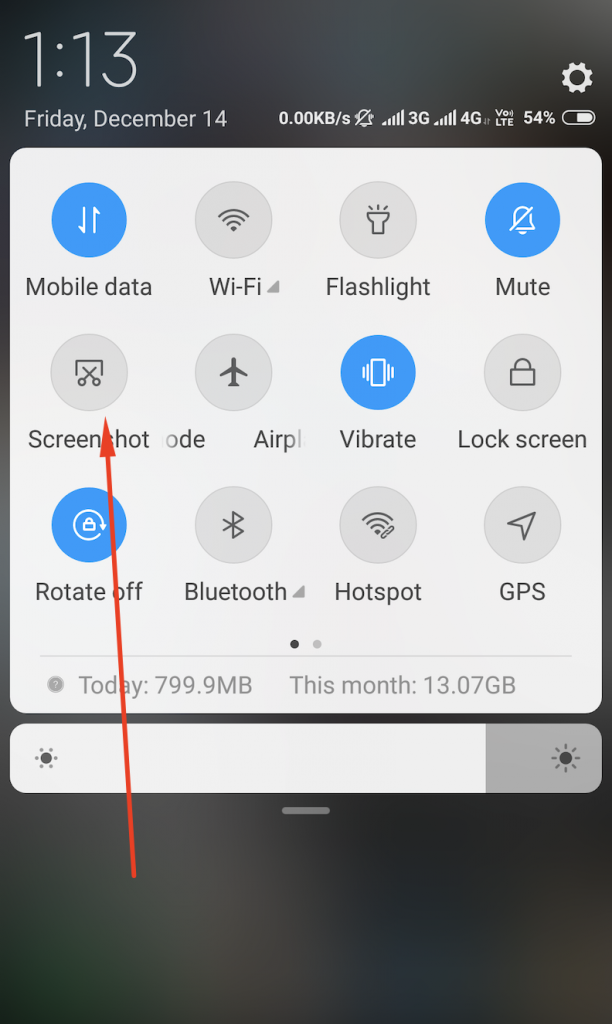
Screenshot Notification toggle to take screenshot on Mi Mix 3 - You have now successfully taken screenshot on your phone. Head over to Gallery > Screenshot Folder and find the latest screenshot taken or drag down the Notification bar once again to read the notification “Screenshot Saved”.
- One can directly Edit or share the screenshot in Xiaomi MI Mix 3 directly from the above Notification itself.
How to Take Screenshot on Xiaomi MI Mix 3 using OK Google
OK Google or Voice Assistant offered inXiaomi MI Mix 3 will really do this job quick and also at the same time make you feel so advanced. So to capture Screen using Voice assistant in Mi Mix 3 just follow as mentioned.
- Step 1: Open the screen which you want to capture on Xiaomi MI Mix 3.
- Step 2: Long tap Home Soft Key or Say “Ok Google”.
- Step 3: Once you see screen “Hi, How Can i Help?”, Simply say “Take Screenshot” or “Capture Screen“.
- Step 4: Rest of the job is taken over by the Voice Assistant while you feel proud of what you have done. You can now find the screenshot taken from the Notification bar or by browsing over to Gallery and Screenshot folder.
At times you might get error saying, “Please Enable Screenshot at Android, Google Search App and Assistant Settings and Restart the Assistant.” , then in this case, do as directed:
- Go to the settings ofXiaomi MI Mix 3. And head over to Apps and Notifications > Default Apps > Assist and Voice Input.
- Now Enable “Use Screenshot” option from the list.
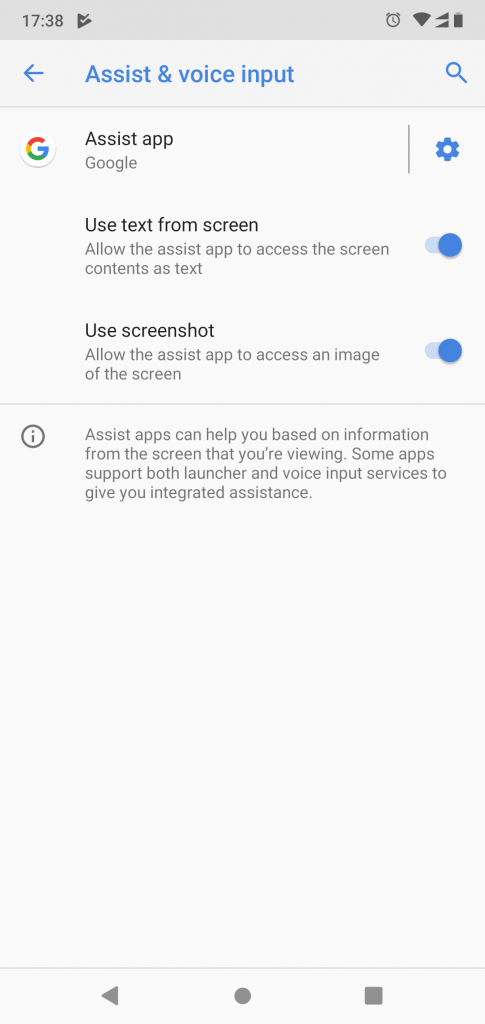
Enable Use Screenshot Option in Ok Google - Restart Google Assistant Now.
How To Take Long Screenshot on Xiaomi MI Mix 3
What if you want to take screenshot of two or more pages in one go and that too with good quality. This is also possible onXiaomi MI Mix 3. To take long screenshot or scrollable screenshot in MI Mix 3 follow these steps:
- Navigate to the page you want to take Scrolling Screenshot on.
- Press “Volume Down” and “Lock/Power” Key together until your screen blinks.
- Once you see your screenshot taken and pops up in upper right corner. Tap On it and Click on “Scroll” icon.
- Now scroll down to the pages which you want to capture in one go and wait simultaneously for the phone to do its work.
- The Long Screenshot which you just took in Xiaomi MI Mix 3 is now saved in your Gallery and is ready to be edited and shared.
Video Guide to Take Screenshot onXiaomi MI Mix 3
We have combined all above methods into one video so that you can easily get methods working to take Screenshot inXiaomi MI Mix 3. Do not forget to subscribe to the channel for further interesting tricks on Xiaomi MI Mix 3.
Note: If Scrolling Screenshot or Long Screen Capture guide is not working for your phone, then do let us know in comments so that we can help you fix it easily.