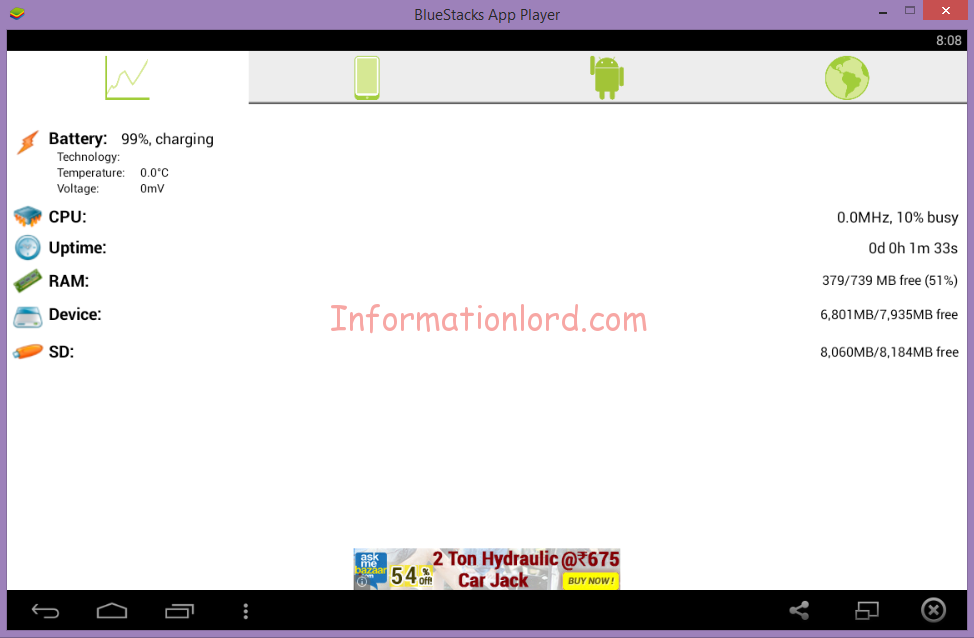
Most of us are familiar to Bluestacks to run Android on PC. Sometimes it crashes or show glitches while running apps, mainly when its running high memory apps. Bluestacks takes limited amount of memory from computer to use as Random Access Memory, which is 739 MB. When it run high memory apps, RAM acts same as phone’s RAM and its not enough for big apps then. Fortunately it can be increased and hence one can Increase the speed of Bluestacks too.
Bluestacks is a Virtual Platform to run Android Apps on PC/Laptop without the help on Android Phone. It is also used for testing Android Apps created on PC itself! Before moving further, make sure your PC’s RAM has sufficient amount to allocate more amount of size to Bluestacks RAM. If you have any app installed to see RAM size, check RAM size before doing anything, or install Smart System App to see info as below.
Also Read : Install Dual WhatsApp on Bluestacks
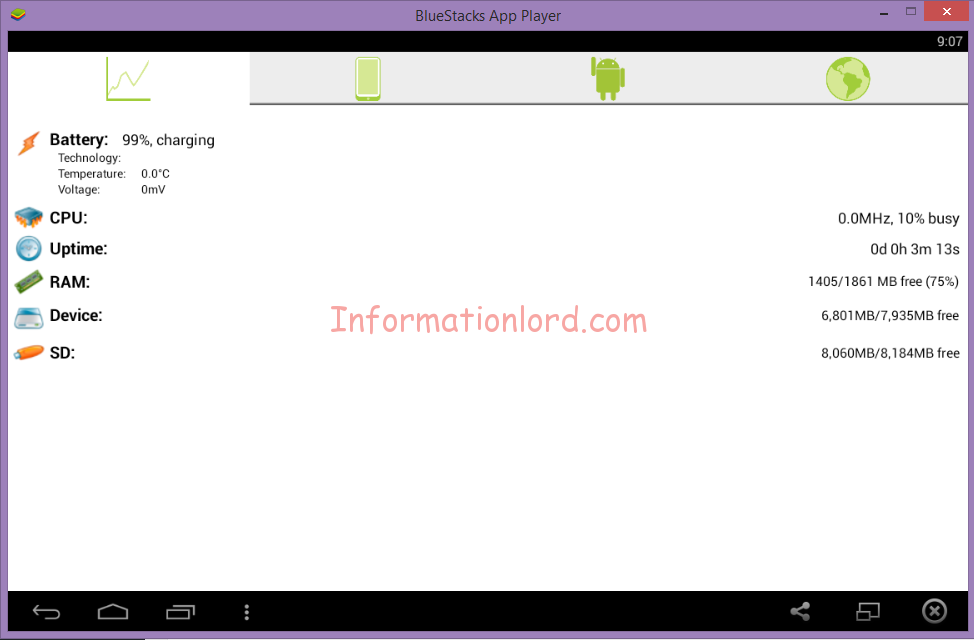
It shows 739 MB, we will be increasing it upto 1861 Mb. Follow these steps :
Tutorial To Increase Bluestacks RAM Size
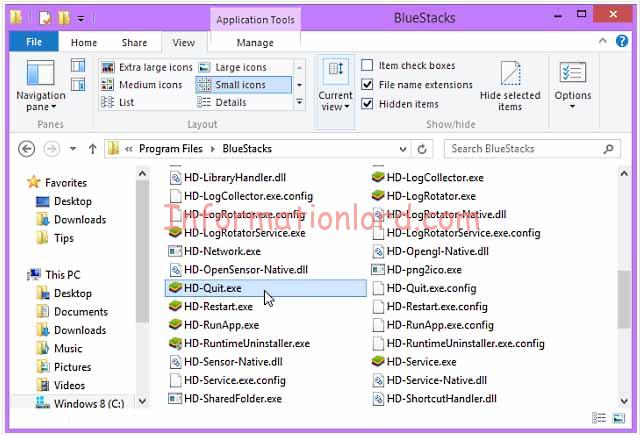
Step 1.
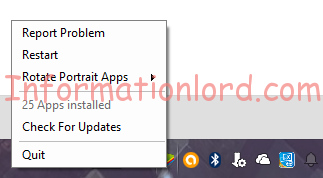
Go to C:\Program Files\ or C:\Program Files (×86)\Bluestacks and double click on “HD-Quit.exe“, or if Bluestacks is running then right click on Bluestacks Agent Online at taskbar and click on Quit, to stop Bluestacks services completely.
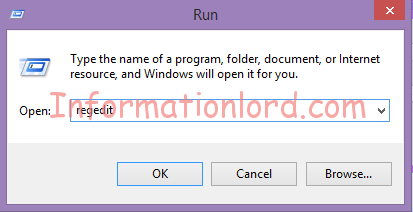
Step 2.
Press Windows key + R to open Run dialog box. Type regedit in the box and click Ok. Click yes if User Control Program dialogue box pops up.
Step 3.
Go to HKEY_LOCAL_MACHINE\SOFTWARE\BlueStacks\Guests\Android and click on Memory option.
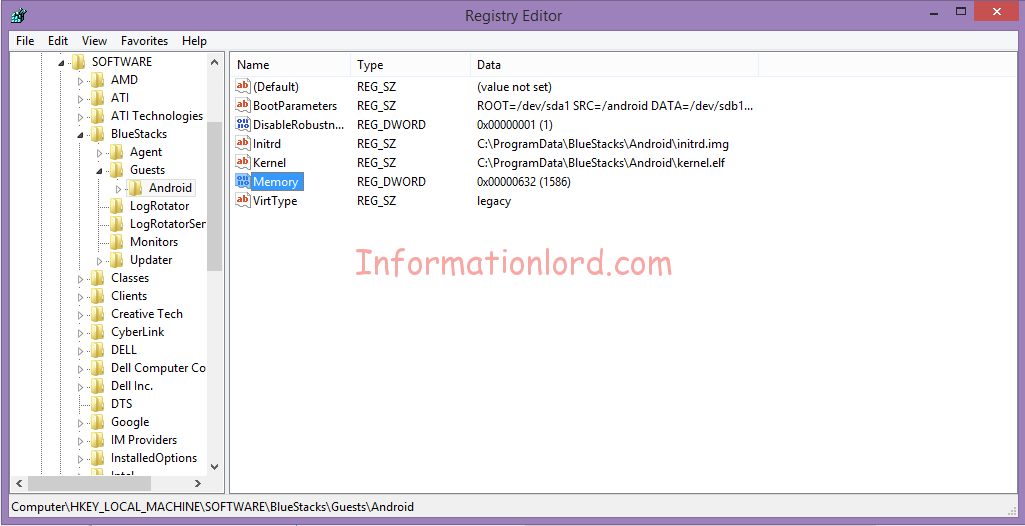
Edit DWORD value box pops up.
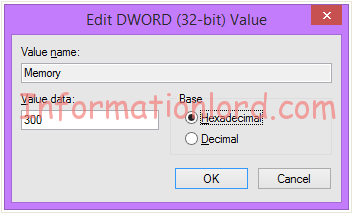
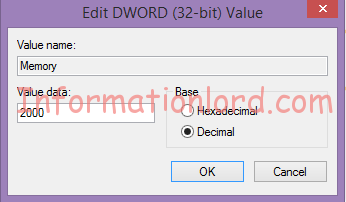
Step 4.
Click on Decimal option, and change value to 2000 in value data field. Click OK and exit registry.
Now open Bluestacks and check RAM size.
You will notice that you have achieved success with the guide to Increase Bluestacks RAM Size. This tutorial is quiet easy to do. If you are struck anywhere, then please feel free to comment. We are here at your service!
Wow it worked thanks!
but is keeps freezing
I only have 2 gb of on my Laptop but i need 4gb on bluestacks, is there a way for me to bypass this.
Physical memory is only 2gb, and a ready boost of also 2gb, can i remake the way windows adds ram using the HDD/SDD with bluestacks?
Hello Cat, this situation is quite awkward. I am afraid you won’t be able to do the same!
if we have 8 gb of ram installed in pc the we get only 4gb ram
means half of the ram installed in the pc and we cant extend ram of emulators
Exactly True!
Great step by step. For me you don’t need to install any external software like BlueStacks Tweaker or anything to increase BlueStacks App Player’s RAM, it can easily done manually from your system.
I have 2gb ram ..what value should i give in regedit memory value data??
Please help me…
I would recommend to not increase the RAM in this case, or else your system will crash.
Hi there,
I have change the RAM of bluestack as you shown and make it up to 2000. But, it can run well at the setup. My laptop got 8GB of RAM and I have install to D drive where got almost 914 GB. How can I fix it? Thank you.
I’ve 8GBs of RAM on my laptop, I’ve dedicated 4GB to BlueStack, since then, it has a trouble opening, any good explanation why this is happening?
Can you try it with just 1.8Gb in the beginning!
I instlled the app.. it says you must be on jio network or must have a active jio device.. I can view the channel on my phone..
please suggest.
Please update to the latest JIO tv and check again.
im having trouble downloading bluestacks for my sister it doesn’t show up for her
does it work on a laptop?
Yes, Bluestacks is available for all laptops Windows and Mac!
It needs some amount of GPU power too to work, or even install
I’d had an old PC, having a 128MBs of graphical memory size, BlueStacks refused to even install on that PC.
What happen if I give 1.5 GB to bluestacks if I have 2GB
Your PC will become slow if you do so! Not recommended!
My comp has 4gb ram how much should I increase up to in bluestacks at first it shows me 1gb ram I want to increase this so how much should I increase the ram …?
You can bump upto 2Gb of Bluestacks Ram as you are given with 4GB RAM on your PC!
i did it but the settings in my bluestacks doesnt change at all still at 1989 my pc is 64bit windows 10 lenovo had lots of free space and has 4gb more than i think.
How much RAM have you dedicated to the Bluestacks?
I also tried the same procedure bt the ram still remains same….Help plz!! Atleast need 1.5 gb so that i can play games without hanging problems…
Can you specify the current configuration of your PC!
how much should I put on DWORD If I have 3.9 GB Of space? (On my PC)
I guess you should allocate 1500MB, that will let you do your tasks peacefully! But make sure that you do not play huge games while your bluestacks is running!
i have 12 gb ram,how much should i put in bluestack?This method work for bluestack 2 or just work for blustack 1?
Allow around 4 GB for Bluestacks!
how to increase in MAC OS
I’d prolly be very late on this but I have a 4GB RAM installed in my PC. How much should I put on Bluestacks?
Put it to 1.5Gb. That will be great as well!
My PC’s RAM is 4 GB but I have very heavy games and software in it like as “NFS: Most Wanted”, “Android Studio”, “IntelliJ Idea”,GTA, XAMPP, Oracle….. and Windows 10…. Then How much RAM should I choose… BCZ even on default RAM I feel my PC too slow now after installing some softwares…
The best optimisation for you is : While running bluestacks stop other things and while running games Stop Bluestacks so that it is not an issue for you. Give 2 GB for Bluestacks and it will eventually speed up the processing on your Bluestacks.
Mine is 2 gb ram how much should I use
I would recommend that you go for only 1GB or else you gonna mess your PC setup!
Hi I would need help to do this on latest version of Bluestacks as of May 22nd because it doesn’t seem to increase my RAM (I want to have at least 32 GB, my computer has enough space for that) Thanks.
Have you tried this procedure to Increase RAM of Bluestacks after May 22 Bluestacks update?
i did the same and bluestacks Ram actually increased but not upto 1.8gb it was only from 739 to 849 mb.. can you help me to fix the problem ? thank you for the support.
Can you let me know the specs of your PC! What is the actual RAM which is available for your usage! Thank You!